A home improvement blog

A home improvement blog

Sunday, February 19, 2012

Who needs a microwave, anyway?

Two weekends ago, my brother Paul helped Ryan and I paint the kitchen. We chose a color called "Goldtone" which is yellow but not bright yellow. It's soft and, hopefully, will match well with whatever counter we get...eventually.

Ryan also installed the microwave we bought in July...which had been in its box in the middle of the kitchen, serving as an island, since the day it was delivered. He had to build a custom cabinet to go above it that holds the microwave's ventilation system, electrical cord, etc.

Yesterday, my father-in-law arrived in town. He's going to stay for a week and help Ryan work on the house. They plan to replace windows in the kitchen (awesome!), work on cabinets, get the electrical and water lines for the refrigerator hooked up, and probably several other things.

Right now I am sitting in the living room, trying to ignore the ripping, scraping sounds coming from the kitchen behind me. I just have to keep telling myself that messes now = beautiful kitchen later.

We have only used our newly-installed microwave a few times...we got used to not needing one at all. Aside from using the microwave at work for my lunches, we haven't used one at all since we moved here. Yes, heating up leftovers in the oven was a slow process, but I didn't really miss not having "the modern convenience."  

Here are some photos of the painting process and the new oven/microwave/cabinet setup.


Here, Paul removes the terrible old curtain rods. 


Our kitchen wall color. 


It's hard to tell, but this is what it looks like after it was painted. 


Eventually, cabinets will cover that oven cord...just imagine it all completed! Yes, that wall is painted. In bright light it doesn't look very yellow. 


This is our new computer! We bought it very gently used but it's basically brand new, and it was a great price. It was time to retire the Dell that I got when I graduated from high school in 2006 (yes, I was still using it until this one arrived).  

Saturday, January 21, 2012

The Spice Rack

Hello all! Happy 2012.

Ryan and I spent the one remaining week of Christmas Break (after several weeks in Colorado and St. Louis) designing and building a spice rack cabinet for the kitchen. 

Because the cabinets that were in this part of the previous homeowner's kitchen were not standard and housed the out-of-date stove and oven, we have to put the whole area together like a puzzle of old and new cabinets. 

After figuring out which cabinets from the other side (where the fridge will be) we can move, we ended up with several inches of space the height of a cabinet that wouldn't be taken up by anything else. Ryan had a brilliant idea: build a tall, skinny, sliding spice rack that hid inside a cabinet. 

Using some old materials and some new, we created it! I helped a little, by drilling some holes and holding things and keeping Ryan company in the cold garage. 

He built the door of the cabinet from an old one, but had to match the curves to the rest of the cabinet doors. Good thing he bought a router when we got back to Hillsdale. :)

Here are some photos from the installation:


This is the inside part that rolls out. You can see some nice, old glue from behind the old stove on the wall there...we haven't gotten to doing the walls yet. 


Ryan showing off his work and sporting some new glasses! 


The empty cabinet! Nice, huh?


And the cabinet once I filled it with everything. It actually fit everything I have, spice-wise. There are some repeats in there, so I guess I have room to grow. 

While in Colorado, we took a trip to the new IKEA in Denver to spend some gift cards my awesome sister-in-law gave us. We bought some sleek, brown-black (that's the official color name...) pieces: a coffee table and a sideboard. 

Here's a photo of the new sideboard and what Ryan has dubbed "Maria's reading corner." 


The gold clock is from my grandma's house - I thought it was the coolest thing when I was a kid...turns it out's all just plastic. Oh well. The inside part turns back and forth, which is sweet. The crucifix is a Christmas gift from my parents. It was made in the Holy Land! 

And here is a photo of Ryan playing video games after a long day of cabinet finishing and installing and IKEA sideboard building. He is resting his feet on the new coffee table. 


This photo gives you a good idea of the natural light in the room in the evening...kinda dark, as the windows face east. In the morning, it's very bright and lovely. 

Yes, the carpet is still there...we're going to keep it until winter is over. Ryan wants to add some insulation under the floor in the basement before tearing it out. 

Today, Ryan is continuing working on building a cabinet to go above the microwave. Those two things will go right next to the spice rack. The stove will be moved over to go underneath them. He has to build a cabinet for above the microwave because there wasn't one before we moved in. The lady's Montgomery Ward microwave sat on the counter top. So, that's next! 

Interesting fact: We haven't used a microwave in our house since we got here. (So, since July 19th or so). I have used one at work and we did when we were in Colorado, but not at all here! Who needs such modern conveniences, anyway! 

- The Servolds 


Sunday, December 11, 2011

Christmastime in Hillsdale

Well, I guess I'm not a very regular blogger....

Today I made two kinds of Christmas cookies to round out the two kinds I made yesterday and last weekend. I also made chocolate-covered pretzels. This in no way compares with the six or seven kinds of fanciful cookies my mom makes every Christmas. But, someday, I may do just as well.

A week from now we'll be heading home to Colorado for a few weeks! We're going to drive, which is a little scary, but hopefully we'll avoid any major snowstorms. I foresee us getting stuck somewhere in Nebraska for three days...

I've been sending out Christmas cards like a real adult, as well. :)

Work on the house has slowed lately...Ryan's struggling to strip the old white paint from inside all of the cabinets. I think we'll make a lot of progress in the last few weeks of Christmas break when we come back before school starts again. (This whole school schedule is pretty great....)

Here are the photos we put on our Christmas card:


This photo of the house was taken by Ryan after we had our first real snow a few weeks ago. Isn't he good? Our house is sort of chunky looking...the teeny windows don't help that. But, I do like our wreath. We plan to replace all the house's windows this coming spring or summer. They are currently single pane...which is not energy efficient.

The top photo of Ryan and I was taken in Colorado during Thanksgiving Break after I was pretty much over the flu I contracted a day and a half in to the trip.

Merry Christmas!

- Maria and Ryan

Sunday, November 6, 2011

An anniversary, Halloween and more about cabinets.

Well, since my last post we have sanded more cabinets, picked out a wood stain, decided we didn't like that color (too orange) and picked out another stain. Then, Ryan stained and finished one cabinet, which is now installed! It was the smallest cabinet, which is why we did it first, and why it doesn't hold that much. It will be above our refrigerator  once that gets moved across the kitchen from it's temporary home.

Here is the finished product:


And here are some photos of Ryan staining with the first color we picked and then decided was too orange. (It's hard to tell from a small sample...)


This is the finished cabinet, compared to the original stain. I think our new color is much warmer and nicer. Hopefully it will look great once we repaint the walls and get a new counter top, as well.


Other goings on: We made two new flower beds out front. One has tulip bulbs planted in it, the other daffodils.


We also made a pumpkin leaf bag family on our porch.


October 22 was our first wedding anniversary! I made this cake, which was marble with vanilla buttercream frosting. Our wedding cake was alternating layers of marble and lemon poppy seed. We didn't save the top for a whole year (would not have survived the move...) so I just decided to make a little one of my own. I made the buttercream frosting from scratch and it was DELICIOUS and so simple. The purple flowers are actually some I saved from our wedding cake - they are made of fondant and so will never go bad. 


For Halloween, Ryan and I were Lois Lane and Clark Kent from Superman. I made myself a little press badge that said "PRESS - Lois Lane - Daily Planet" and Ryan just wore a Superman T-shirt under his "Clark Kent" clothes. 


And this weekend we celebrated my brother Paul's birthday. I made another cake, this time with made-from-scratch chocolate buttercream frosting. Really folks, it's so easy and tastes SO much better than store-bought frosting. 

In case you're interested, here's how I made the vanilla buttercream frosting:

Ingredients: 
- 1 stick unsalted butter 
- 1 pound powdered sugar 
- 1/4 cup milk
- 1 teaspoon vanilla extract
- (1/4-1/2 teas. almond extract...optional...adds more of an interesting flavor)

Place softened butter, milk, vanilla and part of sugar and in electric mixer, beat on slow speed until combined. Gradually add the rest of the powdered sugar, bit by bit, watching texture of frosting. If it's too thick, add a bit more milk. (The key here is tasting frequently and determining what to add more of). Mix until the texture and taste are right, but don't over beat. To make chocolate buttercream, add 1/3 cup (roughly) cocoa powder to the same recipe. (I didn't use the almond extract that time - FYI). You will probably need to add more milk, though, as the cocoa will make it too thick. 

Next time: more cabinets! 

- The Servolds


Thursday, October 6, 2011

Change of Plan

Well, after much fretting about how on earth we would pay for brand new cabinets and countertops for our kitchen (even with a special no-interest-for-six-months Lowe's credit card) we have decided to just sand down and refinish the existing cabinets ourselves.

When the idea of new cabinets became too much, we started scouring Craigslist for gently used/accidentally purchased (wrong size, color) cabinets. We found one great, complete set that a man had purchased to use in his basement finishing project. But, before he could get to that, something happened and he had to move. Totally new cabinet set, made-to-order, $500. Perfect! Ryan made the call on the cabinet listing, which had been posted for several days. The man's wife told him the cabinets sold six hours after posting. It became apparent that the Craigslist approach is only practical if you have the time to watch the page and refresh it all day. Not practical.

I came home from work this past Monday to find Ryan busily sanding down one of the cabinet doors. At first, I didn't even realize what it was. It looked so different! The natural wood is beautiful and these cabinets are totally made of hard wood - that doesn't happen much anymore. I think these cabinets were made-to-order when the house was built - remember, they were built to fit around the funky stove and oven. So, they are quality...just kinda old and grody on the outside.

Tuesday, I came home to find the same sanded-down door with three patches of fresh wood stain in three distinct colors. Ryan made the little display for me to see when I got home and to prove to me that yes, we can make these things great. There will have to be a lot of moving them around and LOTS of sanding, but in the end we will have spent a few hundred dollars on them instead of a few thousand. Plus, we will have the pride of knowing we "did it ourselves."

Here are some photos. This first one is a close-up of some of the cabinets with their doors taken off. That is the original color...and they are all painted with a thick white paint inside (not a fan of that).


And the weird wall where we peeled off wallpaper and the gross grease-encrusted backing behind the old stove...bleh. Those brown smears on there now are just old glue.


The new stain we like - might go slightly darker. The really dark part at the top is the original stain...it doesn't even allow you to see the wood grain.

The three stain samples Ryan left for me to see.

The natural cabinet door after it's been sanded. It looks so great, right?

Also recently, Ryan painted the house porch area out front all white. You may remember from previous photos/posts that it was a bizarre combination of two faded, ugly red colors. Eventually, we plan to put rock in this area and make it much more lovely, but this is a good, cheap, temporary solution until we get to that...next year.


When we're not working on the house (or can't for lack of money to purchase things like countertops) I have been working away on our wedding scrapbook. Our first anniversary will be Oct. 22. Sadly, this won't be done then. It was neglected in the move and I never really got that far along on it anyway. I have only made it through the ceremony. And now, I've run out of pages and need to go to a JoAnn store to buy more. The closest one is in Jackson, 40 minutes away. Sigh.

Also recently, Ryan and I went to Toasted Mud, a local paint-your-own-pottery studio. These are our creations. Ryan made the margarita glass (I love the way he blended the colors) and I made the bowl.

If anyone is interested in helping us sand cabinets...let me know.

- The Servolds -


Sunday, September 11, 2011

Painting Progress


Well, we haven't done much to the house lately as our financial resources have slowed...but, Ryan has done some work on the trim around the garage and windows.

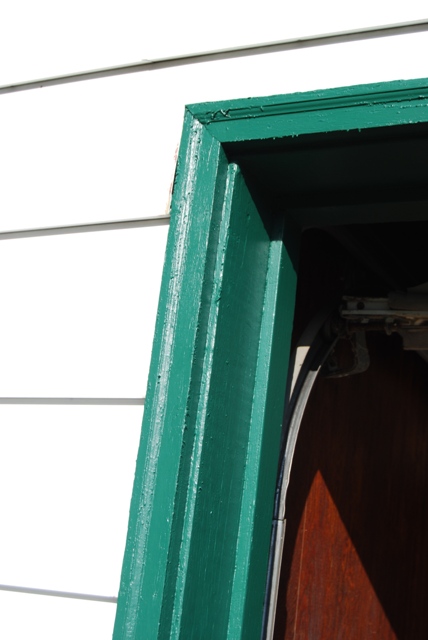
We picked out a nice, dark green color to paint the trim and windows (that will look better when we repaint the house a darker color).

Here are a few photos:

Ryan had to scrape off several layers of old paint in order to get down to the wood.


He got a lot of paint flecks on his face during this process.


The color is called "Gondola Ride."


After scraping, one coat of primer, and two coats of paint. It's very bright-looking in the bright sun, but we like it.


From the slowly-changing Servold household,

Maria

Sunday, August 14, 2011

Bye bye, bushes!

Well, we're making progress, but it's slow progress. I started work recently which means I am not here during the day to help (*cough* supervise) work on the house. However, Ryan is doing quite well on his own.

One of the biggest improvements we've made is to rip out the old, ugly bushes that were half dead or eaten by deer along the two front sides of the house. Apparently, the neighbors hated them as well, so it looks like we did a service to everyone by getting rid of them.

I helped trim some of them down (Ryan did most of them, though) and then he dug out around their bases until the root balls were somewhat loosened. Then, he wrapped chains around the stumps and pulled them forcefully from the ground with his truck.

Here is a before photo of the house with bushes...sorry it's a phone photo so it's not as good.


And here's an photo of them gone! That stump is ripped out, we just haven't been able to get rid of it yet. The city brush/limb drop off place only takes stumps on certain days...


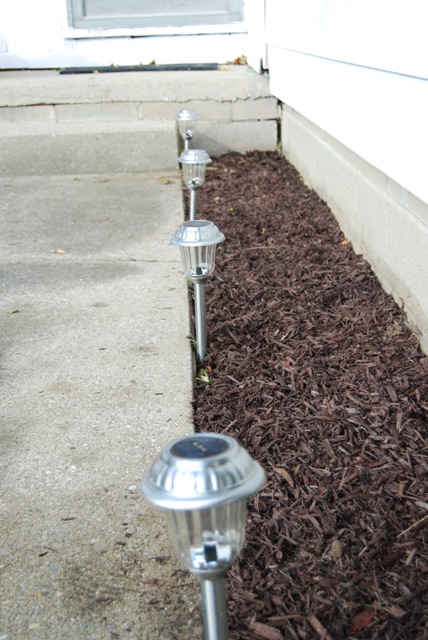
Also note the little solar-powered lights we bought on sale at Home Depot. The neighbors love them.

Right now, Ryan is working on installing the dishwasher. But, apparently, he thinks he needs another part. We were just at the hardware store 15 minutes ago. Sigh.


Here's our stove, free-floating on its own, though we are using it, which is great.


And that's it for now! The hardware store closes at 6 on Sundays, we think, so that gives us 12 minutes to go back.

Later today, I am going to get sheets on the bed in the guest room to welcome Will this weekend. Our first house guest!

~