Well, I guess I'm not a very regular blogger....
Today I made two kinds of Christmas cookies to round out the two kinds I made yesterday and last weekend. I also made chocolate-covered pretzels. This in no way compares with the six or seven kinds of fanciful cookies my mom makes every Christmas. But, someday, I may do just as well.
A week from now we'll be heading home to Colorado for a few weeks! We're going to drive, which is a little scary, but hopefully we'll avoid any major snowstorms. I foresee us getting stuck somewhere in Nebraska for three days...
I've been sending out Christmas cards like a real adult, as well. :)
Work on the house has slowed lately...Ryan's struggling to strip the old white paint from inside all of the cabinets. I think we'll make a lot of progress in the last few weeks of Christmas break when we come back before school starts again. (This whole school schedule is pretty great....)
Here are the photos we put on our Christmas card:
This photo of the house was taken by Ryan after we had our first real snow a few weeks ago. Isn't he good? Our house is sort of chunky looking...the teeny windows don't help that. But, I do like our wreath. We plan to replace all the house's windows this coming spring or summer. They are currently single pane...which is not energy efficient.
The top photo of Ryan and I was taken in Colorado during Thanksgiving Break after I was pretty much over the flu I contracted a day and a half in to the trip.
Merry Christmas!
- Maria and Ryan
A home improvement blog
A home improvement blog
Sunday, December 11, 2011
Sunday, November 6, 2011
An anniversary, Halloween and more about cabinets.
Well, since my last post we have sanded more cabinets, picked out a wood stain, decided we didn't like that color (too orange) and picked out another stain. Then, Ryan stained and finished one cabinet, which is now installed! It was the smallest cabinet, which is why we did it first, and why it doesn't hold that much. It will be above our refrigerator once that gets moved across the kitchen from it's temporary home.
Here is the finished product:
And here are some photos of Ryan staining with the first color we picked and then decided was too orange. (It's hard to tell from a small sample...)

This is the finished cabinet, compared to the original stain. I think our new color is much warmer and nicer. Hopefully it will look great once we repaint the walls and get a new counter top, as well.
Other goings on: We made two new flower beds out front. One has tulip bulbs planted in it, the other daffodils.

Here is the finished product:
And here are some photos of Ryan staining with the first color we picked and then decided was too orange. (It's hard to tell from a small sample...)

This is the finished cabinet, compared to the original stain. I think our new color is much warmer and nicer. Hopefully it will look great once we repaint the walls and get a new counter top, as well.
Other goings on: We made two new flower beds out front. One has tulip bulbs planted in it, the other daffodils.
We also made a pumpkin leaf bag family on our porch.
October 22 was our first wedding anniversary! I made this cake, which was marble with vanilla buttercream frosting. Our wedding cake was alternating layers of marble and lemon poppy seed. We didn't save the top for a whole year (would not have survived the move...) so I just decided to make a little one of my own. I made the buttercream frosting from scratch and it was DELICIOUS and so simple. The purple flowers are actually some I saved from our wedding cake - they are made of fondant and so will never go bad.
For Halloween, Ryan and I were Lois Lane and Clark Kent from Superman. I made myself a little press badge that said "PRESS - Lois Lane - Daily Planet" and Ryan just wore a Superman T-shirt under his "Clark Kent" clothes.

And this weekend we celebrated my brother Paul's birthday. I made another cake, this time with made-from-scratch chocolate buttercream frosting. Really folks, it's so easy and tastes SO much better than store-bought frosting.
In case you're interested, here's how I made the vanilla buttercream frosting:
Ingredients:
- 1 stick unsalted butter
- 1 pound powdered sugar
- 1/4 cup milk
- 1 teaspoon vanilla extract
- (1/4-1/2 teas. almond extract...optional...adds more of an interesting flavor)
Place softened butter, milk, vanilla and part of sugar and in electric mixer, beat on slow speed until combined. Gradually add the rest of the powdered sugar, bit by bit, watching texture of frosting. If it's too thick, add a bit more milk. (The key here is tasting frequently and determining what to add more of). Mix until the texture and taste are right, but don't over beat. To make chocolate buttercream, add 1/3 cup (roughly) cocoa powder to the same recipe. (I didn't use the almond extract that time - FYI). You will probably need to add more milk, though, as the cocoa will make it too thick.
Next time: more cabinets!
- The Servolds
Thursday, October 6, 2011
Change of Plan
Well, after much fretting about how on earth we would pay for brand new cabinets and countertops for our kitchen (even with a special no-interest-for-six-months Lowe's credit card) we have decided to just sand down and refinish the existing cabinets ourselves.



When the idea of new cabinets became too much, we started scouring Craigslist for gently used/accidentally purchased (wrong size, color) cabinets. We found one great, complete set that a man had purchased to use in his basement finishing project. But, before he could get to that, something happened and he had to move. Totally new cabinet set, made-to-order, $500. Perfect! Ryan made the call on the cabinet listing, which had been posted for several days. The man's wife told him the cabinets sold six hours after posting. It became apparent that the Craigslist approach is only practical if you have the time to watch the page and refresh it all day. Not practical.
I came home from work this past Monday to find Ryan busily sanding down one of the cabinet doors. At first, I didn't even realize what it was. It looked so different! The natural wood is beautiful and these cabinets are totally made of hard wood - that doesn't happen much anymore. I think these cabinets were made-to-order when the house was built - remember, they were built to fit around the funky stove and oven. So, they are quality...just kinda old and grody on the outside.
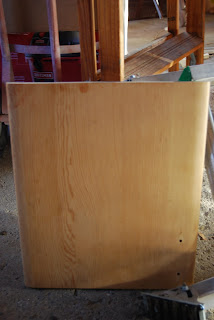
Tuesday, I came home to find the same sanded-down door with three patches of fresh wood stain in three distinct colors. Ryan made the little display for me to see when I got home and to prove to me that yes, we can make these things great. There will have to be a lot of moving them around and LOTS of sanding, but in the end we will have spent a few hundred dollars on them instead of a few thousand. Plus, we will have the pride of knowing we "did it ourselves."
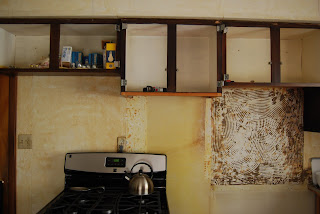
Here are some photos. This first one is a close-up of some of the cabinets with their doors taken off. That is the original color...and they are all painted with a thick white paint inside (not a fan of that).

And the weird wall where we peeled off wallpaper and the gross grease-encrusted backing behind the old stove...bleh. Those brown smears on there now are just old glue.

The new stain we like - might go slightly darker. The really dark part at the top is the original stain...it doesn't even allow you to see the wood grain.

Also recently, Ryan painted the house porch area out front all white. You may remember from previous photos/posts that it was a bizarre combination of two faded, ugly red colors. Eventually, we plan to put rock in this area and make it much more lovely, but this is a good, cheap, temporary solution until we get to that...next year.

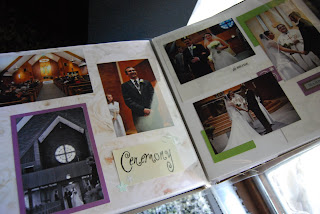
When we're not working on the house (or can't for lack of money to purchase things like countertops) I have been working away on our wedding scrapbook. Our first anniversary will be Oct. 22. Sadly, this won't be done then. It was neglected in the move and I never really got that far along on it anyway. I have only made it through the ceremony. And now, I've run out of pages and need to go to a JoAnn store to buy more. The closest one is in Jackson, 40 minutes away. Sigh.
Also recently, Ryan and I went to Toasted Mud, a local paint-your-own-pottery studio. These are our creations. Ryan made the margarita glass (I love the way he blended the colors) and I made the bowl.

If anyone is interested in helping us sand cabinets...let me know.
- The Servolds -
Sunday, September 11, 2011
Painting Progress
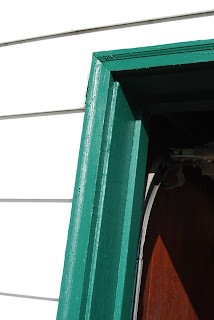
We picked out a nice, dark green color to paint the trim and windows (that will look better when we repaint the house a darker color).
Here are a few photos:
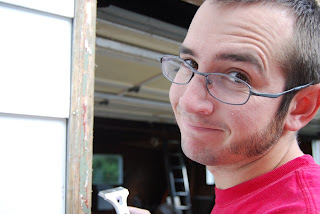
Ryan had to scrape off several layers of old paint in order to get down to the wood.


He got a lot of paint flecks on his face during this process.
The color is called "Gondola Ride."

After scraping, one coat of primer, and two coats of paint. It's very bright-looking in the bright sun, but we like it.
From the slowly-changing Servold household,
Maria
Sunday, August 14, 2011
Bye bye, bushes!
Well, we're making progress, but it's slow progress. I started work recently which means I am not here during the day to help (*cough* supervise) work on the house. However, Ryan is doing quite well on his own.
One of the biggest improvements we've made is to rip out the old, ugly bushes that were half dead or eaten by deer along the two front sides of the house. Apparently, the neighbors hated them as well, so it looks like we did a service to everyone by getting rid of them.
I helped trim some of them down (Ryan did most of them, though) and then he dug out around their bases until the root balls were somewhat loosened. Then, he wrapped chains around the stumps and pulled them forcefully from the ground with his truck.
Here is a before photo of the house with bushes...sorry it's a phone photo so it's not as good.

And here's an photo of them gone! That stump is ripped out, we just haven't been able to get rid of it yet. The city brush/limb drop off place only takes stumps on certain days...

Also note the little solar-powered lights we bought on sale at Home Depot. The neighbors love them.
Right now, Ryan is working on installing the dishwasher. But, apparently, he thinks he needs another part. We were just at the hardware store 15 minutes ago. Sigh.
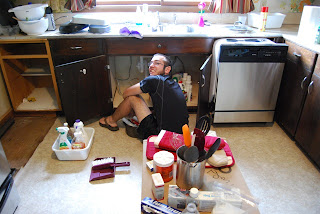
Here's our stove, free-floating on its own, though we are using it, which is great.

And that's it for now! The hardware store closes at 6 on Sundays, we think, so that gives us 12 minutes to go back.
Later today, I am going to get sheets on the bed in the guest room to welcome Will this weekend. Our first house guest!
~
One of the biggest improvements we've made is to rip out the old, ugly bushes that were half dead or eaten by deer along the two front sides of the house. Apparently, the neighbors hated them as well, so it looks like we did a service to everyone by getting rid of them.
I helped trim some of them down (Ryan did most of them, though) and then he dug out around their bases until the root balls were somewhat loosened. Then, he wrapped chains around the stumps and pulled them forcefully from the ground with his truck.
Here is a before photo of the house with bushes...sorry it's a phone photo so it's not as good.

And here's an photo of them gone! That stump is ripped out, we just haven't been able to get rid of it yet. The city brush/limb drop off place only takes stumps on certain days...

Also note the little solar-powered lights we bought on sale at Home Depot. The neighbors love them.
Right now, Ryan is working on installing the dishwasher. But, apparently, he thinks he needs another part. We were just at the hardware store 15 minutes ago. Sigh.

Here's our stove, free-floating on its own, though we are using it, which is great.

And that's it for now! The hardware store closes at 6 on Sundays, we think, so that gives us 12 minutes to go back.
Later today, I am going to get sheets on the bed in the guest room to welcome Will this weekend. Our first house guest!
~
Sunday, July 31, 2011
The first two weeks
Well, we've been living in our new house for a little over two weeks now and the one word that can sum up that experience best is: adventure.
This is our master bedroom, painted the same nasty mint green color as most of the house. WHY did someone make that color choice?!
 This is the main hallway, bedrooms and guest bathroom all off of it. The master bath is through our bedroom, which is the last door on the left. Again, the mint green color. It looks more teal on here than it does in real life.
 The living room. I LOVE the ceiling and think it's really interesting. The carpet contains the colors white, black, brown and green. Oh yeah. There is a wood-burning fireplace hiding off to the left in that brick area...which I would love to paint the same cream color I'm planning for the walls.
 Kitchen side one, showing the lovely wallpaper and cabinets which are functional, but slightly icky/old. That dishwasher doesn't work, by the way. It has since been ripped out.
 Kitchen side two: REALLY a great view of the wallpaper here - it has gold in it, in case you can't tell. Luckily, it came off in its full sheets when I pulled from the top down. We found a date written underneath it that said "9-4-70." I assume that's the day they put it up. Awesome.
 Here's a shot of the kitchen once the appliances were dropped in (fridge is out of frame to the left, temporarily) and some of the wallpaper has been peeled down. The yellow stuff on the walls is glue from the wallpaper, which has to be washed off.
There have been a lot of suprises so far that, for the most part, have not been good...but we're cruising along in our 60s home. It seems the phrase that we hear the most from people concerning various aspects of our house is: "That probably should have been fixed/changed/updated/redone/addressed a long time ago."
For example:
- The electrical box needs upgrading
- There were no appliances
- The cabinets are kind of nasty/worn out
- There's old rat poison in the kitchen cabinets
- The water softener (essential in this area apparently) needs to be replaced
- The plumbing under our master bathroom sink crumbled when Ryan tried to tighten it, prompting an immediate replacement and also prompting my father-in-law to declare that lots of problems in the house will have "cancer"...aka... multiple, major issues instead of just one surface one.
The reason for all of these things I think is that the house has been vacant for six years when the elderly woman who lived here moved to a nursing home. And before that, she didn't really update anything. (She did get a new roof, hot water heater, A/C and furnace in the late 90s/early 2000s, though, which is great).
We have purchased appliances and so they are sort of free-floating in the kitchen for now until we get to cabinets/counter tops to surround them with. The shag carpet in the living room is going to have to stay until we have time/money to pull it up and buff up the wood floors underneath. I can't repaint the rooms until Ryan does some drywall replacement on bad patches.
Speaking of Ryan: thank goodness I have a husband with the knowledge and skill to fix/repair basically anything that's wrong with the house. He can remodel anything and we will save a lot of money not having to pay a contractor to do it. Unfortunately, our water softener (model circa 1962) can't be fixed. They don't make parts for the Culligan Mark 2 anymore.
Thanks to an idea from Dan at The Coloradoan, I am going to attempt to make a time-lapse video of our updates to the kitchen (major project #1). Right now I am just taking a photo from the exact same spot as we do new things to it and I will put them all together eventually. Tips on an easy way to turn a bunch of photos into a time-lapse video?
For now, here are some photos of our humble abode:
 This is the main hallway, bedrooms and guest bathroom all off of it. The master bath is through our bedroom, which is the last door on the left. Again, the mint green color. It looks more teal on here than it does in real life.
 The living room. I LOVE the ceiling and think it's really interesting. The carpet contains the colors white, black, brown and green. Oh yeah. There is a wood-burning fireplace hiding off to the left in that brick area...which I would love to paint the same cream color I'm planning for the walls.
  Kitchen side one, showing the lovely wallpaper and cabinets which are functional, but slightly icky/old. That dishwasher doesn't work, by the way. It has since been ripped out.
  Kitchen side two: REALLY a great view of the wallpaper here - it has gold in it, in case you can't tell. Luckily, it came off in its full sheets when I pulled from the top down. We found a date written underneath it that said "9-4-70." I assume that's the day they put it up. Awesome.
 We also found this wallpaper behind one of the appliances...it looks like they got the rest off before they put up the flowery stuff. This reminds me of both the Jetsons and the opening credits of 'Catch Me if You Can.'
 Here's a shot of the kitchen once the appliances were dropped in (fridge is out of frame to the left, temporarily) and some of the wallpaper has been peeled down. The yellow stuff on the walls is glue from the wallpaper, which has to be washed off.
 I am just reminding myself over and over that we bought the house for so little money that it's worth spending time and money to make it awesome. I mean, look at the size of that kitchen! Tons of potential. It just needs some TLC. And, now that we have appliances, we can stop living off of hot dogs from the grill and can store more than what fit in the mini fridge we borrowed from the Stockdales. It's the little things.
- The Servolds
Friday, July 15, 2011
Our house awaits...
Well, Ryan and I will be starting the 20-hour drive to Hillsdale this Sunday. Barring any U-Haul breakdowns or other problems, we should arrive Monday evening. Tuesday will be spent appliance shopping and maybe moving a few boxes in to our new home! Wednesday we will close on the house and hopefully move everything in and HOPEFULLY actually get to sleep there that night.
Here's what we have to look forward to...

Because the internet is a scary place, I'm not going to put the address of the house up. E-mail me if you want it.
I think our first steps will be:
1). Purchasing kitchen appliances that work and hauling away the old ones that don't.
2). Ripping out those nasty bushes and putting in something lovely, like roses (a full weekend project, if not more than that).
3.) Mowing the lawn.
4). Doing some needed work of dirt backfill on the north side of the house.
...after we unpack, of course.
More to come!
Here's what we have to look forward to...

Because the internet is a scary place, I'm not going to put the address of the house up. E-mail me if you want it.
I think our first steps will be:
1). Purchasing kitchen appliances that work and hauling away the old ones that don't.
2). Ripping out those nasty bushes and putting in something lovely, like roses (a full weekend project, if not more than that).
3.) Mowing the lawn.
4). Doing some needed work of dirt backfill on the north side of the house.
...after we unpack, of course.
More to come!
Subscribe to:
Comments (Atom)


